
Total Shoulder Arthroplasty
Indications
Total shoulder replacement is indicated for two main diagnostic groups:
- Rheumatoid arthritis
- Osteoarthritis (primary and secondary)
Among the causes of secondary osteoarthritis are the effects of old trauma, postdisloca-tion arthropathy, cuff tear arthropathy, congenital dysplasia, the effects of old sepsis, and osteonecrosis. More rarely, surgery is indicated for tumor and failed surgery (including revision of previous prosthesis). Whatever the cause of the destructive process on the articular surface, the net result remains the same, that is increasing pain and stiffness. The overwhelming indication for surgery is uncontrolled pain 'with loss of movement and consequent loss of function. The expectations for shoulder replacement are higher than for lower limb joint replacements. If in the hip and knee, for instance, a stable pain-free joint with two-thirds range of motion is achieved, then this is seen as an excellent result. At the shoulder, however, being stable and pain free is not enough. It is the most mobile joint in the body, and hence a much greater range of mobility is expected. The results of shoulder replacement depend almost entirely on the adequacy of soft tissues and musculature and restoration of the anatomic geometry of the joint. This cannot be so easily achieved at the shoulder as it can at either hip or knee. When assessing a shoulder before replacement, it is often thought that there is a complete loss of rotator cuff. There may indeed be loss of rotator cuff function, but this does not imply discontinuity. Often, because of gross erosion of joint surfaces, the center of rotation has been medialized and hence the rotator cuff defunction. If the rotator cuff has lost its action, then the unopposed deltoid has its resolution of forces directed superiorly, and hence upward subluxation of the humoral head results. If this process can be reversed, that is, by lateralization of the center of rotation by retensioning both cuff and deltoid, then restoration of function can be expected. Unfortunately, in the most severely affected joints, long-term adaptive changes have occurred, that is, shortening of rotator cuff muscles; therefore, complete restoration of geometry by lateralization of the center of rotation is not possible, because the soft tissues cannot be elongated adequately to the anatomic position.
In the more severe cases, loss of the rotator cuff may indeed be true and complete. In this situation, it may be wiser to consider hemiarthroplasty alone because the incidence of glenoid loosening in the face of complete rotator cuff loss is greater. This can be surmised on a mechanical basis alone. If the rotator cuff is not present, the humeral head is subluxed superiorly. If the glenoid replacement is then placed in the anatomic position, a rocking or toggle movement increases the chance of loosening. Interestingly, the results of hemiarthroplasty in relation to total replacement are not too dissimilar. However, it has been shown that hemiarthroplasty alone may not give the complete relief of pain experienced by the total replacement.
All shoulder replacements of whatever design require good bone stock for fixation of the glenoid component. If medial erosion of the glenoid has occurred such that the erosion is to the base of the coracoid, then it is unlikely that adequate seating of the glenoid component ¦will be achieved, and it may be better in this situation to accept the hemiarthroplasty alone.
Contraindications
Contraindications are very similar to those for joint replacement anywhere.
- Sepdid. If there is any persistent septic focus, this must be dealt with before surgery. If there is any question of old deep bone infection from previous surgery, the surgeon must be certain that this has been eradicated.
- Undtable joint. If the joint is unstable before shoulder replacement, it will almost certainly be unstable after shoulder replacement. For example, painful subluxation secondary to brachial plexus palsy would better be served by arthrodesis.
- Charcot-type joint. If there is loss of feeling within the joint, such as in syringomyelia, then the rate of longer term failure and loosening of the joint would be unacceptably high.
Neer-Type Shoulder Replacement
Charles Neer has done much of the pioneering -work on shoulder replacements, and the largest series reported in the literature so far is his personal series with the longest follow-up.1,2 Many other shoulder replacement designs have been produced as modifications of his design, but the surgical exposure and technique are similar for all, with various relatively minor modifications. The more common variations include modularity of the humeral head cemented and cementless stem fixation, modularity of the glenoid component, and many different variations of glenoid fixation. Increasingly sophisticated instrumentation is available for aligning both the humeral and glenoid components. Reference must be made to the more specific literature for the individual implantation techniques for each design. Following is a description of the basic Neer-type prosthesis operative technique.
Preoperative Investigation
Good-quality radiographs are essential to assess the available bone stock. At least an anteroposterior view and axillary view must be obtained. If any other more sophisticated investigations are available, they are helpful. For example, if the degree of glenoid erosion is unclear, then computed tomography (CT) scanning is very helpful to assess the amount of bone available for glenoid fixation and to visualize the degree of posterior or anterior erosion. It is helpful to have assessed the acromioclavicular joint to see if this is the source of any part of the pain around the shoulder complex. If local anesthetic tests indicate that this is a source of the problem, then excision arthroplasty of the acromioclavicular joint may be contemplated at the same time.
Position of Patient
The beach chair semisitting position with the point of the shoulder extending over the corner of the table is used. Folded towels are placed under the ipsilateral scapula to hold it forward. The table is adjusted to the semisitting position with the upper part of the body raised 30 to 40 degrees and the knees raised sufficiently to prevent the patient from sliding down the table. A short arm board is attached to the side of the table at the level of the shoulder where it will allow hyperextension of the arm off the side of the table during preparation for insertion of the humeral component.
Technique
The extended anterior deltopectoral approach as described in Chapter 1 is used.
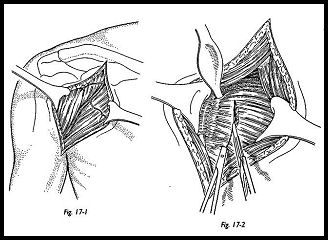
The deltoid is retracted laterally, the pectoralis is retracted medially, and the clavipec-toral fascia is incised extending downward from the coracoacromial ligament (Fig. 17-1). The subacromial space is cleared, and the undersurface of deltoid is mobilized so that this may be levered posterolaterally "like slipping a coat off a shoulder." The lateral part of the coracoid muscle insertion may be divided to increase access.
Before opening the shoulder, maximum external rotation is achieved by stretching the subscapularis in external rotation of the arm. Before opening the subscapularis, thought must be given to eventual closure. As previously stated, the joint may well be eroded medially, and hence the subscapularis may be adaptively shortened. If there is marked loss of external rotation, then the subscapularis may well have to be lengthened during the exposure to allow for easy closure with external rotation.
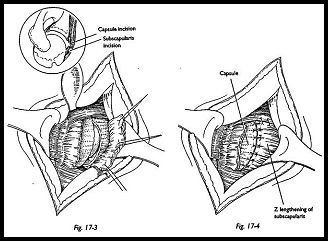
The subscapularis is divided approximately 2 cm medial to the biceps groove (Fig. 17-2).
This muscle complex may be lengthened by a Z-plasty or an oblique incision of the muscle (Fig. 17-3). The muscle edges are held with stay sutures, and the joint is dislocated anteriorly using a Bankart skid (17-4). Extensive division of the capsule inferiorly may be required to allow this to happen. A blunt elevator should be used to protect the axillary nerve inferiorly. Anterior dislocation is aided by forced external rotation of the arm, but in the rheumatoid patient particularly, this must be done gently to prevent fracture of the humerus. Osteophytes are trimmed from the humeral head to get some appreciation of the anatomic neck of the humerus.
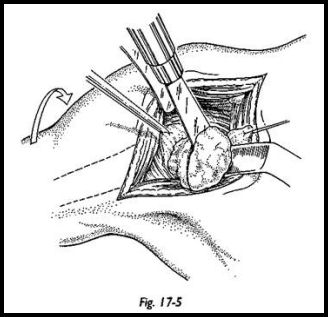
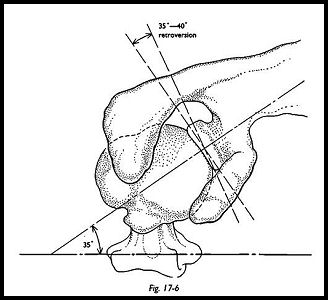
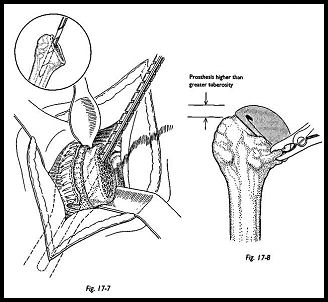
A trial prosthesis is used to determine the proper level of humeral head osteotomy (Fig. 17-5). Because marked humeral head erosion may have taken place, a surprisingly small amount of bone may need to be removed. The prosthetic head should extend slightly above the level of the greater tuberosity (it is very important to maintain this length); the degree of retroversion is measured by using the forearm with elbow flexed to a right angle as the goniometer. The osteotomy should be made with 35 degrees of retroversion in relation to the shaft (Fig. 17-6).
The medullary canal is prepared with the reamers, and a trial prosthesis is inserted. The shoulder is reduced to assess the prosthetic height, joint stability, and the thickness of the head of the prosthesis (Figs. 17-7 and 17-8).
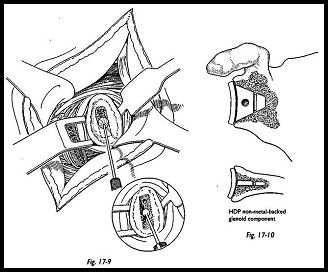
Attention should then be turned to preparation for the glenoid component. The arm is abducted and supported on a sandbag placed on the short arm board. The proximal end of the humerus is subluxed posteriorly with a Bankart skid or Fukuda retractor. Any soft tissue remaining around the labrum may be excised. A central vertical slot is marked using the glenoid jig (Fig. 17-9). A slot the size of the central glenoid fin is then cut into the glenoid using a dental drill and small angled curette. The trial prosthesis is used to see that adequate and firm seating may be obtained (Fig. 17-10). There should be no rocking or tilting of the component, and the articular surface of the glenoid should be contoured to support the component. Cementing technique of the glenoid component is of the utmost importance. Pulsed lavage is used to clean the bone and remove loose fragments from the slot in the glenoid, and then a small swab is packed into the depth of the glenoid to maintain a dry cancellous surface. If there is difficulty maintaining this, then the glenoid cement can be put in in two phases. The first phase is to prevent bleeding, and the secondary phase is for fixation of the glenoid component. After the cement has been inserted and the glenoid component pushed into place, the cement is allowed to harden and the glenoid assessed for security.
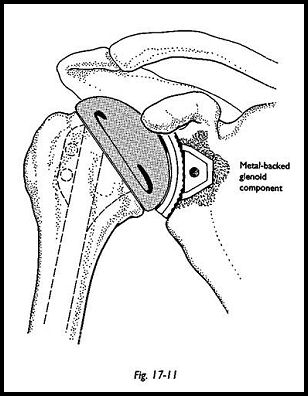
The humeral component should always be cemented. One should not just rely on a press fit, although sometimes this may feel adequate. Trial reduction is now made with the humeral component (Fig. 17-11). The correct component is chosen at this stage. The thickness of the humeral head component must allow for adequate closure of the sub-scapularis with some degree of external rotation possible. The component is cemented in 35 degrees of retroversion, again judged by reference to the humeral epicondyles and the forearm with the elbow flexed. Again, it must be noted that the component must lie slightly superior to the level of the greater tuberosities to prevent impingement of the tuberosity against the acromion. Once the cement is set, the joint is reduced and soft tissue reconstruction is made. This is the most important aspect of the operation. At this stage, it may be determined that an acromioplasry or excision arthroplasty of the acromioclavicular joint is needed. The rotator cuff must now be reconstructed if at all possible, and the subscapulars must be closed. Once the subscapulars has been sutured, assessment of movement must be made on the table so that at least 20 degrees of external rotation are achieved. If external rotation is not achieved on the table, then it will not be achieved in the postoperative rehabilitation exercise program and is essential for mobility of the joint. A suction drain is inserted, and the -wound is closed in the usual way.
Postoperative Management
The postoperative regimen must be individualized for the patient and discussed with the physiotherapist, because only the surgeon knows the adequacy of soft tissue repair, the state of rotator cuff, the security of the subscapularis repair, and so on. A detailed postoperative regimen has been described by Neer and Hughes7 and divided into three phases. The first such phase includes early passive or gentle active assisted motion the day after surgery to prevent adhesions. Pendular motions in the flexion extension plane are encouraged. During the third postoperative 'week, isometric exercises are introduced for the external rotators, internal rotators, extensors, flexors, and abductors. The second phase is a more active exercise program begun at 4 to 6 weeks postoperatively. This includes supine forward elevation, forward elevation in a standing position assisted by the other extremity, and continuation of rotational exercises with some element of controlled self-stretching added. Strengthening exercises may be converted from isometrics to resistor exercises using various grades of elastic tubing. After 3 months, residual deficiencies and range of movement and strength can be addressed by stretching and the continued strengthening program. The patient is encouraged to keep up this long-term stretching and strengthening program for a year after surgery, because benefits can accrue throughout this period. Later, stretching and hanging from a high cupboard or door are particularly helpful.
Total Shoulder Replacement
Surface Replacement Arthroplasty (Copeland Type)
Surface replacement arthroplasty (Copeland type)3-6 was developed primarily for use in the less destroyed shoulder, such that maximum bone stock is retained, minimal bone is removed, and fixation is cementless. With this design, the humeral shaft is not violated, and therefore there is no stress riser effect of the tip of the prosthesis. Stemmed designs of shoulder replacement may fracture more easily at the tip of the prosthesis, causing a difficult to treat humeral shaft fracture. This is becoming more common in the elderly and the frail rheumatoid patient. A further advantage is that the humeral head may be centered on the anatomic humeral head rather than centered on the alignment of the humeral shaft. Roberts et al.6 have shown that the humeral head is not centered on the alignment of the humeral shaft but is posteriorly translocated on average 4.6 mm; therefore, any stemmed design of prosthesis that is not specifically made for left or right shoulders cannot perfectly mimic the anatomy. This may be of theoretical importance only, but it seems reasonable to try to mimic as closely as possible the anatomic geometry.
Indications
The ideal indication for surface replacement arthroplasty is a joint in which the gleno-humeral joint surfaces have been eroded, but the basic bony geometry remains intact, and the rotator cuff is also intact. However, it has been used in much more grossly-destroyed shoulders with marked degrees of erosion on the humeral and glenoid side and with absence of rotator cuff. If the rotator cuff is ruptured such that it cannot be repaired, then only a humeral hemiarthroplasty should be used to avoid the possible increased incidence of late glenoid loosening. The indications are otherwise the same as for any joint replacement at the shoulder, that is, rheumatoid arthritis and osteoarthritis both primary and secondary.
Contraindications
If the humeral head erosion is so gross that no humeral head remains, then surface arthroplasty is obviously impossible and a humeral head replacement prosthesis must be used (i.e., of the Neer type). If the glenoid erosion is such that the glenoid has been eroded beyond the base of the coracoid, then not enough bone stock is present for fixation of the glenoid component, and a hemiarthroplasty would have to be used.
Preoperative Investigation
Plain radiographs, anteroposterior, and axillary lateral, are usually adequate. Radiograph templates are available for estimating the prosthetic size of both humeral and glenoid components. If there is any doubt as to the adequacy of bone stock on the glenoid side, then CT scanning is helpful. Specific investigations to detect the integrity of the rotator cuff are not necessary, because this will be seen at the time of operation and the decision made at that time to do either a hemiarthroplasty or total replacement.
Position of Patient
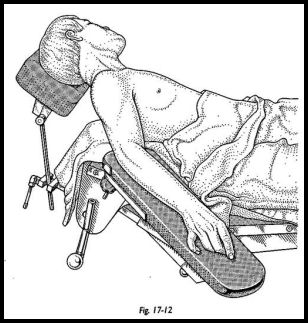
The patient is placed in the beach chair-type position with a neurosurgical headpiece and a short arm board attached to the operating table with a sandbag under the medial border of the scapula thrusting the shoulder forward (Fig. 17-12). The patient is placed near the edge of the table with the arm board attached and the neck laterally flexed away from the affected side (care must be taken with the rheumatoid patient).
Technique
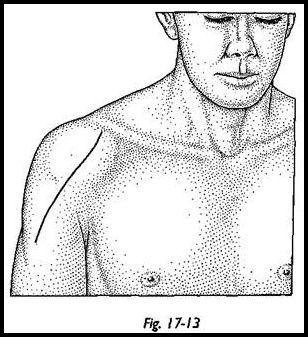
The extended anterior deltopectoral approach (Fig. 17-13) is described in the previous section and in Chapter 1. The anterosuperior approach (MacKenzie) may also be used because this improves the visualization of the glenoid side. It should be noted at this stage that exposure is more difficult with this prosthesis because the humeral head is not being removed and hence getting adequate visuahzation of the glenoid surface may be difficult and require more exposure and mobilization than the standard prosthesis. During the early exposure, the arm is held in external rotation to stretch the subscapularis and anterior capsule.
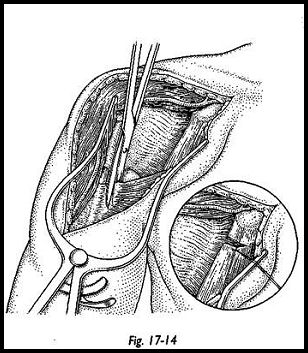
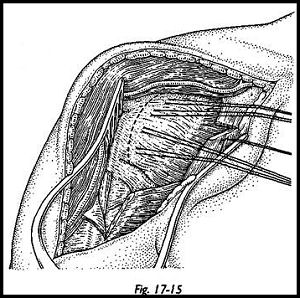
If the external rotation is markedly limited, then a subscapularis lengthening must be contemplated (Fig. 17-14). The subscapularis must be lengthened during the exposure such that it can be repaired with lengthening when the 'wound is being closed (Fig. 17-15). The method of subscapularis lengthening is detailed in the previous section on Neer arthroplasty.
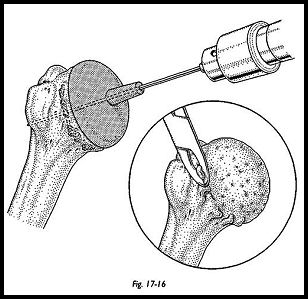
Once the joint has been opened, the humeral head is delivered into the wound by an external rotation extension and adduction maneuver. At this stage, the arm may have to be dropped off the proximal end of the short arm board on the side of the operating table. Once the humeral head is totally exposed, osteophytes are removed to determine the true anatomic neck of the humerus (Fig. 17-16). The movement of these osteophytes may be quite extensive, because they can very misleadingly alter the shape of the humeral head; until they are removed, no assessment must be made as to the placement of the prosthetic humeral head.
The humeral drill guide is placed on the humeral head to gauge the center of the surface. The free edge of the guide cup must run parallel to the anatomic neck of the humerus. A K wire is passed down the cannulated part of the guide, and this is used to determine the 35 degrees of retroversion required. This is judged in relation to the humeral epicondyles, the forearm being used as a goniometor. An easy way to judge this is to first place the humeral cap with the K wire at right angles to the forearm, and then with the humeral cap held still, externally rotate the arm 35 degrees. This should bring the K wire (axis of the humeral head) pointing toward the posterior lip of the biceps groove and should also look anatomically central on the humeral head.
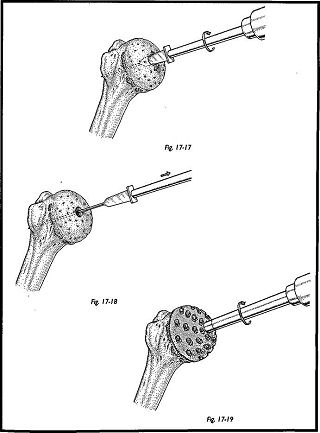
Once satisfied that the humeral cap is well centered, the surgeon drills the K wire through the head to engage the lateral cortex of the humerus. The humeral guide cap is then removed. The humeral stem hole cutter is then drilled over the guide wire, and the central drill hole is made (this is the longer of the two hole cutters). The humeral surface cutter is used to shape the humeral head, placing the central lug in the pilot hole (Figs. 17-17 to 17-19). The shaping is continued until the bone is seen to extrude through all holes of the perforated cutter.
The trial humeral prosthesis is now inserted to test for adequacy of fit. If the fit of the trial prosthesis is adequate, then attention is turned to preparation of the glenoid. The prosthetic head is left in situ to prevent retractors distorting the humeral head surface (Fig. 17-20). A Bankart Skid or Fukuda retractor is used to push the humeral head posteriorly if an anterior deltopectoral approach has been used, or inferiorly if an anterosu-perior approach has been used.

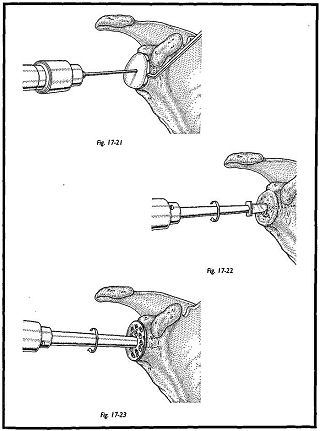
An en face exposure of the glenoid must be obtained. It can be awkward to achieve this, but it is always possible by incising the posterior capsule and circumscribing the whole glenoid to allow this posterior or inferior translocation. The center of the glenoid is found using the glenoid drill guide, the shorter of the two canulated taper drills is passed over the guide wire, and a central hole is made (Figs. 17-21 to 17-23). The glenoid surface cutter is then passed into the central pilot hole, and the surface is shaped to meet the posterior surface of the glenoid prosthesis. Sometimes this step is not necessary, and only multiple fine drill holes are made in the glenoid surface to allow the bone surface to bleed and remodel to the posterior surface of the prosthesis. The trial glenoid is now implanted and a trial reduction made.
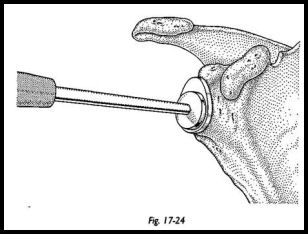
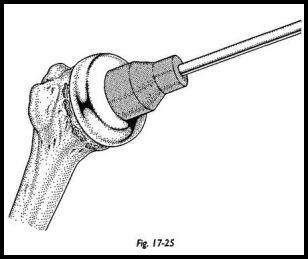
At this stage, adequacy of soft tissue closure is assessed. The subscapularis must be closed to allow at least 20 degrees of external rotation. If external rotation is not gained on the operating table, then it is unlikely it will be gained afterward during the rehabilitation phase (Figs. 17-24 and 17-25). At this stage, the lateralization of the center of the rotation is attempted to the anatomic position using the different thicknesses of head and glenoid available.
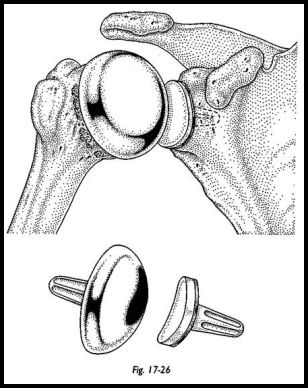
In practical terms in the severely eroded joint, this is often a compromise between anatomy and adequacy of soft tissue closure. If the joint is lateralized mechanically too much, then the subscapularis and rotator cuff cannot be closed (Fig. 17-26).
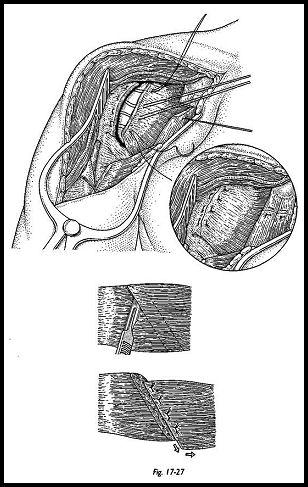
The definitive joint is then implanted by direct impaction without cement. Three sharp blows with the mallet ensure fixation. At this stage, if any rotator defect is present, it is closed by local muscle transfers if at all possible (Fig. 17-27). The wound is then closed with suction drainage.
Postoperative Management
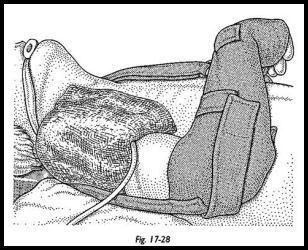
An interscalene block is useful for postoperative pain control during the first 12 to 16 hours after surgery (Fig. 17-28). A three-dose intravenous antibiotic regimen is used routinely, and dressings are changed at 24 hours. On the first postoperative day, fingers, wrist, elbow, and early pendulum movements are started. The physiotherapist does passive flexion—extension in the scapular plain with no external rotation allowed at this stage. The patient is placed in a sling and usually allowed home about the fifth day or when pain control is adequate for an early passive mobilizing regimen. The pendulum movements and passive flexion-extension are continued until the third week, when active assisted and stretching exercises are begun. At 6 weeks, the strengthening program is started, and the stretching program is continued. The patients are told that the movements will go on improving for at least 1 year after surgery and are strongly encouraged to keep up this long-term stretching program. All patients need the help and advice of a physiotherapist during the early stages, but depending on motivation, can continue this themselves, with monitoring during clinic visits. Patients are understandably reluctant to continue the stretching and strengthing regimen after they have achieved an early pain-free functional range, but they must be strongly encouraged to keep up the regimen, otherwise the best will not be gained from the shoulder.
References
- Neer CS (ed): Gleno-humeral arthroplasty in shoulder reconstruction. WB Saunders, Philadelphia, 1990
- Neer, CS, Watson KC, Stanton FJ: A recent experience of total shoulder replacement. J Bone Joint Surg [Am] 64:319, 1982
- Copeland SA: Cementless shoulder replacement: a new design. Bone Joint Surg [Br], suppl. 1, 75:42, 1993
- Copeland SA: Cementless total shoulder replacement. In Post M, Morrey BF, Hawkins RJ (eds): Surgery of the Shoulder Mosby Year Book, St. Louis, 1990
- Copeland SA: Total Shoulder Surgical Technique: Zimmer, 1991.
- Roberts S, Foley A, Swallow H et al: The geometry of the humeral head and the design of prostheses. J Bone Joint Surg [Br] 73:647-50, 1991
- Neer CJ, Hughes M: Gleno-humeral joint replacement and postoperative rehabilitation physical therapy. 55:850, 1975
Suggested Readings
Bell S, Gschwend N: Clinical experience with total arthroplasty and hemiarthroplasty of the shoulder using the Neer prosthesis. Int Orthop 10:217-22, 1986
Figgie HE, Inglis AE, Goldberg VM et al: Analysis of factors affecting the long term results of total shoulder arthroplasty in inflammatory arthritis. J Arthroplasty 3:123-30, 1988
Wilde AH: Shoulder arthroplasty—what is it good for and how good is it? In Matsen FA, Fu FH, Hawkins RJ (eds): The Shoulder, a Balance of Mobility and Stability. American Academy of Orthopaedic Surgeons Symposium, September 1992
